(Weekend bonus, on the off-chance that anyone cares about this topic)
I could have titled this "The Majesty of Fire" because this is about the part of outdoor cooking that gives us that clean, puerile thrill: burning shit. Applying matches to stuff and watching big flames shoot up into the air. Using your kettle grill for a miniature re-enactment of the Dresden firebombing. You and your matches becoming Shiva, the Destroyer of Worlds.
The reason for avoiding that title is that fire has precious little to do with cooking. This is a widespread misconception among the grilltarded – that food is cooked over roaring flames. No. Food is not cooked by fire. Food is cooked by heat. Fire is not a necessary indicator of heat. Not to get all existential about it, but what is fire? Perhaps a necessary first question is, what is charcoal? Well I'm glad you fucking asked.
Charcoal: Real charcoal is wood. That's it. It is wood that is "cooked" at an insanely high temperature (around 1000 degrees) in an anaerobic environment until every atom of water, tar, and other organic compounds are vaporized leaving only a solid hunk of light, brittle carbon. It begins its life as normal firewood sealed in a metal retort which has only a few small holes to allow steam and volatile gases to escape. The retort is heated for hours to "burn" away everything but the carbon. But that's the trick; in the absence of oxygen, it doesn't actually burn. After allowing the retort to cool for several hours without air, the wood becomes charcoal. And charcoal is an easy-to-ignite, clean, and dense source of fuel.
(Pre-Fire steps: Is the bottom of your grill free of ashes from previous cooking sessions? If not, empty it. Open the bottom ventilation holes on your kettle.)
Fire: Igniting charcoal simply initiates the process of burning off whatever impurities remain in the wood and unlocking our access to the fuel inside. If you see flames and decide to cook your food over them, you are cooking your food in a bath of hot, toxic gases being vaporized so that the fuel can begin generating heat. I can't stress this enough, yet I try because I have seen it so many times: do not douse your charcoal in lighter fluid, set it ablaze, and throw your food over the ensuing inferno.
So what should you do?
Well, you could invest $15 in a chimney (or, if you're handy, I suppose it would be simple to make one out of an old coffee can). In this instance your task is simple: ignite the chimney (from below, of course) and wait. WAIT. Wait until you see no flames, no smoke, and almost no "black." You want uniform ashing and heat. That means everything is light gray and emitting a sinister red glow.
Sans chimney, the "pyramid" method works well. Arrange an appropriate amount of charcoal in a pyramid formation on your grill's lower grate, ignite (prefereably without lighter fluid, but I won't get all judgmental), and wait. WAAAAAIT. Novices see the fire disppear and assume that they either missed their opportunity to cook or need to add 3 gallons of lighter fluid. No. You're fine. The fire will "go out" after a few minutes. Really. It's OK. When you see the uniform light gray and the sinister red glow, you're ready. Here is a visual reference. Do not even think about cooking until you see that (although I assume you'll be dealing in smaller quantities).
You are now prepared to cook. If you have a gas grill, all you had to do was turn a knob.
But it is a good idea to do so and let the fake lava rocks or ceramic tiles (which will be doing the actual cooking) heat up for at least 10 minutes before proceeding.
The food you plan to cook should be at room temperature or thereabouts; take it out of the fridge before you start lighting fires to let it warm up. Under no circumstances should food be taken directly from the fridge (or, god forbid, the freezer) and thrown on the grill. This will dramatically increase the odds of the charred exterior/raw interior phenomenon.
Now that you're prepared, you need to figure out if you're grilling or barbecueing.
The standard American way to do either is to spread all of the coals across the bottom grate, apply the top grate, and throw food at it. Let's not be standard Americans, grilling pre-formed Wal-Mart beef patties (now featuring 10% more spinal column!) inbetween laps of the Jack Links 400. To understand how to set up your heat source, let's understand the two different types of heat involved.
Convection heat, the kind that makes grilling go, is really fucking hot. It is the heat that rises directly upward from your charcoal. Placing your hand a few inches above your coals will be nearly unbearable when they are glowing and ready to go. Radiant heat, as the name implies, radiates outward in all directions. Placing your hand a few inches away from the same coals but at, say, a 60 degree angle would be much more bearable. The point is that putting food over your coals subjects it to phenomenal heat; placing it on the grill but not over the coals subjects it to gentle heat.
When grilling, you need to establish at least two "zones" on your grill. Invest in a long pair of metal tongs to allow you to manipulate the white, glowing charcoal. You need a high-heat grilling zone and a safety/no heat zone. In other words, not all items on the grill will cook uniformly. So if, for example, one were to put all of the charcoal on one half of the grill, the other half would be cool (absent convection heat). Since your grill will not be covered during proper "grilling" the radiant heat will have almost no impact on your cool zone.
Here is a simple visual representation of two-zone grilling. The metal pan is useful for catching food drippings, which maintains a clean grill. It also makes arranging the coals easier. It's remarkably simple but greatly reduces the incidence of nuclear char on your food.
Grill in the hot zone, then slide the food into the safe zone to wait for its buddies. Gas grills achieve a similar effect by having a raised grate (a "burger balcony") to allow food to be taken off high heat when done.
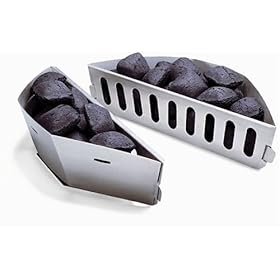
Barbecue employs a very similar setup. Here, however, we are concerned about radiant heat (never convection) and therefore we want to ensure a wide, even distribution of coals that will not subject the food to convection. Translation: transfer the glowing coals to the sides of your grill and leave the center open.
Weber sells nifty little baskets that clip to the sides of the grill and hold coals, or you can simply modify the setup described above for grilling by placing the empty pan in the middle of the grate and arranging the coals around it. In a gas grill, this effect is created by turning on the left burner while leaving the right one turned off. If your gas grill has only one burner, you can't barbecue. Hope you like hot dogs.
Holy crap, you haven't even put food on the grill yet and you're like 97% of the way to pure excellence. I know that makes little sense, but trust me: the overwhelming majority of the mistakes that lead to poor cook-out experiences are made before anyone touches a piece of food. You can avoid this by remembering just a few basic rules:
1. You're not cooking with fire, you're cooking with heat.
2. Be patient; cooking before your heat source is ready means cooking your food in toxic gases.
3. Investing in a few cheap tools – metal pans, tongs, etc – pays off big-time.
4. Know in advance if you are grilling or barbecueing – and the difference between the two.
Next week, you're actually gonna fondle some meat. Conceal your glee.